- HubPages»
- Technology»
- Consumer Electronics & Personal Gadgets»
- Portable Electronics
Understanding Aperture and the Exposure Triangle with Digital Cameras


If you use your digital camera in it's automatic mode, then you just press a button and you've magically got a well exposed photo. Engineers have developed some pretty fancy equipment - like light meters and image processors - that help your camera determine the proper settings to use in a given situation.
Your camera is deciding, on the fly, what to set the aperture, shutter speed, and ISO at to achieve optimal exposure. These settings combine to create the "exposure triangle," and they determine how bright or dark your image is.
The aperture is one part of this exposure triangle, but it also has another potential impact on your image. By understanding how aperture works, you can learn to use the aperture priority or manual modes on your camera and take creative control of your photography back from the computer.
What Is Aperture?
Let's start with a quick and dirty definition of what the aperture setting is.
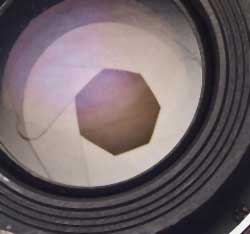
Inside your camera's lens there is a mechanism called a diaphragm. This is a series of fan blades that combine to create a circular opening. This diaphragm can open up to a variety of sizes, and this circular opening is called the aperture. This Yahoo article on aperture provides a more thorough definition, but this should get us started.
Changing the size of the aperture has two distinct effects on your image. First, a large hole will let in more light, while a smaller hole will let in less light. This changes the exposure. However, the size of the aperture also has an effect on perspective the angle at which light hits the sensor. This impacts the depth of field in your image.
How Aperture Effects Exposure
The most direct effect of changing the aperture is that it alters the exposure of your image. Opening up the aperture lets in more light and increases exposure. Closing down the aperture lets in less light and decreases the exposure.
The concept is simple, but the numbers are a bit counterintuitive. The size of the aperture is represented by a number like f/2.8, f/4, and f/5.6. A larger number means a smaller aperture, while a smaller number means a larger aperture.
Your camera probably lets you increase and decrease aperture at small intervals, but there are standard aperture sizes. Each standard size represents an increase or decrease of one stop. Increasing exposure by one stop means doubling the amount of light coming in, while decreasing the exposure by a stop means you're cutting the light in half.
For example, let's take f/4.0 as a starting point. Opening up the aperture to f/2.8 is an increase of one stop - double the light. Closing down the aperture to f/5.6 is a decrease of one stop - halving the amount of light.
With this in mind, you can increase or decrease the size of the aperture to let in the optimal amount of light and create the correct exposure for your image. For a more complete list of standard f-stops, see this article about aperture and exposure.

Effect of Aperture on Depth of Field
Besides exposure, aperture also effects the depth of field of your image. This is a little tougher to wrap your mind around. Essentially, it determines how much of a particular scene will be in focus.
When you take a picture, you focus on a specific point. In the picture to the right, the camera is focused on one particular spot on the plate of cornbread. The area closer to the camera is blurry and out of focus, while the background is also out of focus.
Due to the aperture (f/4.5) and the closeness of the camera to the subject, there's a relatively narrow depth of field. In other words, a very small area of the scene is in focus. This helps draw attention to a particular spot - the cornbread on the plate.
If I had wanted to get more of the cornbread or the background in focus, I would have needed a smaller aperture because this would create a larger depth of field. The image at the top of this hub of the two models by the lake is a good example of this. That image was shot at f/10, a pretty small aperture. This allowed the two models to stand at two different distances from the camera, yet both of them are in focus.
The ideal aperture can vary a lot, but the key idea is to think about whether your want to have a broad focus or a selective focus. If you want to selectively focus on one specific thing, you need a small depth of field and a large aperture. Otherwise, you need a large depth of field and a small aperture.
So What Aperture Should You Use?
Well, that depends on a lot of things. There is no "perfect" aperture, and you'll have to balance your need for light with your goal for depth of field and focus. With that in mind, here are a few rules of thumb to keep in mind. Think of these as starting points from which to experiment.
Indoor Sports. If you're shooting indoor sports, like indoor track or basketball, then you're probably dealing with pretty crappy lighting conditions. In this situation, you'll want to open up the aperture as wide as you can - f/2.8 on a good lens.
Group Photos. When you line up a group of people, you're going to end up with people at varying distances from the camera. The larger the group, the bigger this problem is. This can happen with a wide line as well as when you have people posed several lines deep. In this case, you need a larger depth of field, so you'll want to use a smaller aperture of f/5.6 or f/8.
Landscape Photography. Capturing a scenic landscape probably means getting a lot of things in crisp focus. Here, the larger the depth of field the better. Landscape photographers often use small apertures, like f/11, f/16, or f/22.
Portraits. In a portrait, you want to call attention to the subject and you want to avoid a distracting background. Here, a shallow depth of field helps. A common technique is to use a prime lens that opens up all the way to f/1.8, and you can get an extremely blurry background (called bokeh).
Obviously, none of these are hard and fast rules. You may find you need to do something different based on your own situation and your own goal. However, these suggestions should help you get started.
You may also want to read these other hubs to learn about the other parts of the exposure triangle:


